
Today I am inspired this guy who developed a robotic Lego AT-AT walker and made it onto the MAKE magazine blog for it. He did a really great job of documenting his process and it’s a reminder that I need to do the same.
As part of my current robotics-related independent study I am developing a Lego six-axis robot–it’s pretty involved! The idea is to build one that will be roughly proportional to the one pictured below, which is almost done being installed at Ball State’s Architecture Building:

The most complicated part is the wrist at the end of its arm, which incorporates three distinct axes in a very small space. Transferring axial rotation across other axes takes some mechanical engineering, for which I’m not really trained. Thankfully others who are have shared their work, and I am learning a lot from a couple official Lego sets I own. There are probably many ways to go about this particular problem, but I came to the conclusion that I would need a custom gear–which is also a good excuse to try out our new Formlabs 3D printer. Here’s what I came up with:
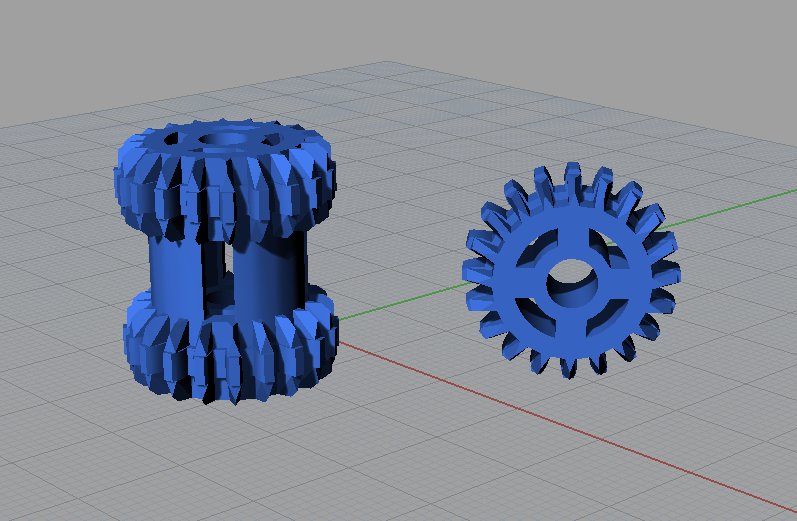
These are based on a standard Lego 20-tooth beveled gear that looks much like the one on the right, except that the Lego one has a cross-shaped opening at the center instead of the circular one pictured above. The circular opening permits the gear to rotate freely around an axle rather than only in concert with the rotation of the axle. The compound gear on the left is two 20-tooth gears joined at an offset that allows the gear to straddle the opening at the center of a turntable. This arrangement is pictured below (left), with the custom gear approximated with the standard Lego gears. The custom gears are being printed on a Formlabs Form 1+ resin-based 3D printer (below right), which so far is producing some pretty amazing results.


I’m still working on getting into the habit of taking pictures at every stage, so unfortunately I don’t have a picture of the first go at printing the custom gear. I will update this post as soon as I do. In the meantime, take my word for it that the printed gear is at the core of the following first pass at a functioning three-axis wrist!

UPDATE: Here are the results of the most recent print. This is a revision of an earlier iteration in which the gear teeth did not taper to facilitate better meshing with other gears. As mentioned above, the circular opening at the center allows an axle to rotate freely within in it; the opposite is true also–the gear can rotate freely around an axle.


This is awesome, Dan! Don’t forget videos 🙂
What’s the strength of the printed parts like? I had been thinking about fitting non-lego motors with printed parts to get more strength/torque but haven’t pulled the trigger on actually going down and printing the pieces out.
Looks like a fun project!